Workday-Pro-Integrations Workday Pro Integrations Certification Exam Questions and Answers
Refer to the following scenario to answer the question below. Your integration has the following runs in the integration events report (Date format of MM/DD/YYYY):
Run #1
• Core Connector: Worker Integration System was launched on May 15, 2024 at 3:00:00 AM
• As of Entry Moment: 05/15/2024 3:00:00 AM
• Effective Date: 05/15/2024
• Last Successful As of Entry Moment: 05/01/2024 3:00:00 AM
• Last Successful Effective Date: 05/01/2024
Run #2
• Core Connector: Worker Integration System was launched on May 31, 2024 at 3:00:00 AM
• As of Entry Moment: 05/31/2024 3:00:00 AM
• Effective Date: 05/31/2024
• Last Successful As of Entry Moment: 05/15/2024 3:00:00 AM
• Last Successful Effective Date: 05/15/2024
On May 13, 2024 Brian Hill receives a salary increase. The new salary amount is set to $90,000.00 with an effective date of May 22, 2024. Which of these runs will include Brian Hill ' s compensation change?
Which components make up the three primary parts of an outbound Enterprise Interface Builder (EIB)?
You are configuring a Core Connector integration that will send data to an external vendor. The vendor requires that the integration output file includes a unique Batch ID in its filename.
This ID must follow the format VNDR_YEARMONTH_seq.xml, where YEAR is the four-digit year, MONTH is the two-digit month, and seq is a five-digit sequence number that must reset to 00001 at the beginning of each new month.
Which settings must you configure on the integration Filename Sequence Generator to produce this Batch ID filename?
Refer to the following scenario to answer the question below.
You need to configure a Core Connector: Candidate Outbound integration for your vendor. The connector requires the data initialization service (DIS).
The vendor requests additional formatting of the candidate Country field. For example, if a candidate ' s country is the United States of America, the output should show USA.
What steps do you follow to meet this request?
Refer to the following scenario to answer the question below.
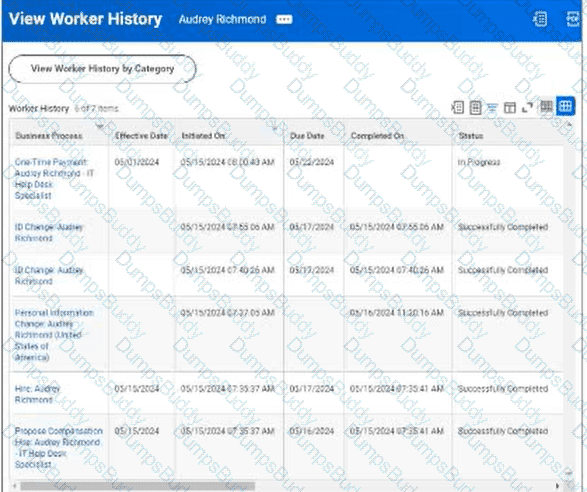
A connector is configured to detect changes to government IDs, personal information, and compensation data. The worker history report below shows recent transactions for a new hire.
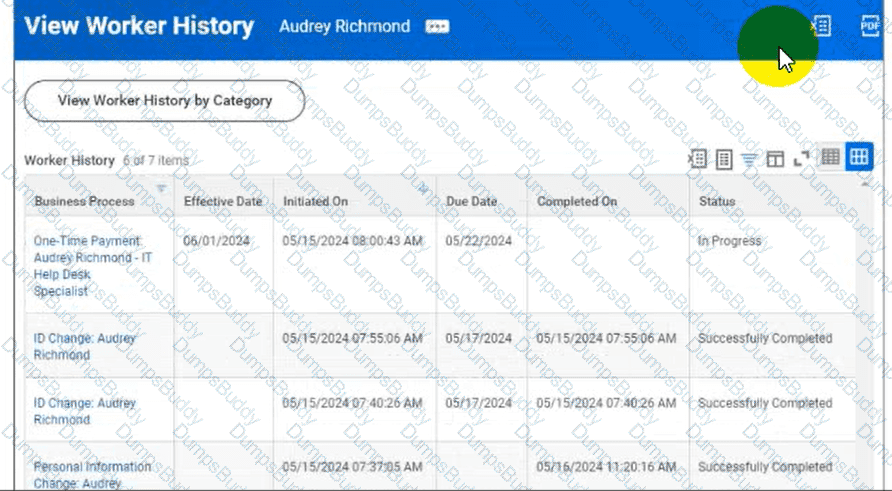
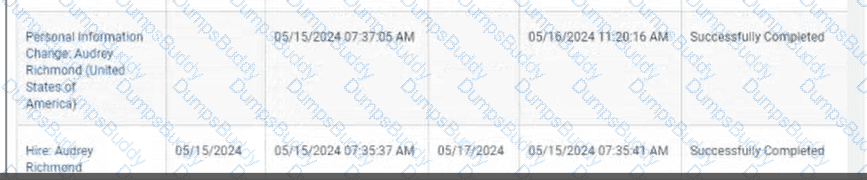
Worker History: Audrey Richmond
The worker history includes a One Time Payment transaction for Audrey Richmond with an effective date of 05/01/2024, initiated on 05/15/2024, due date of 05/17/2024, and status of In Progress. Other transactions shown include ID Change, Personal Information Change, Hire, and Propose Compensation records.
You launch the connector integration to process changes with the following parameters:
As Of Entry Moment: 05/17/2024 12:00:00 AM
Effective Date: 05/17/2024
Last Successful As Of Entry Moment: 05/15/2024 12:00:00 AM
Last Successful Effective Date: 05/15/2024
Why will the integration output file exclude the one-time payment change?
Refer to the scenario. You are configuring a Core Connector: Worker integration with the Data Initialization Service (DIS) enabled to extract worker demographic and contact information. The integration must include worker fields such as name, address, and a calculated field identifying workers eligible for a phone allowance.
The Phone Allowance Type calculated field exists and is functional in the tenant, but it is not displaying in the output.
What configuration step should you complete to include this field in the output?
Refer to the following scenario to answer the question below. Your integration has the following runs in the integration events report (Date format of MM/DD/YYYY):
Run #1
• Core Connector: Worker Integration System was launched on May 15, 2024 at 3:00:00 AM.
• As of Entry Moment: 05/15/2024 3:00:00 AM
• Effective Date: 05/15/2024
• Last Successful As of Entry Moment: 05/01/2024 3:00:00 AM
• Last Successful Effective Date: 05/01/2024
Run #2
• Core Connector: Worker Integration System was launched on May 31, 2024 at 3:00:00 AM.
• As of Entry Moment: 05/31/2024 3:00:00 AM
• Effective Date: 05/31/2024
• Last Successful As of Entry Moment: 05/15/2024 3:00:00 AM
• Last Successful Effective Date: 05/15/2024 On May 13, 2024 Brian Hill receives a salary increase. The new salary amount is set to $90,000.00 with an effective date of April 30,2024. Which of these runs will include Brian Hill ' s compensation change?
What is the purpose of granting an ISU modify access to the Integration Event domain via an ISSG?
After configuring domain security policies, what task must you run to ensure the most recent changes go into effect?
Refer to the following XML and example transformed output to answer the question below.
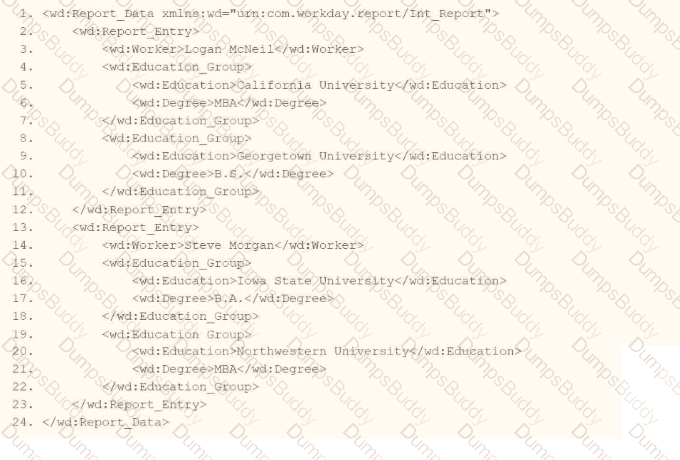
Example transformed wd:Report_Entry output;
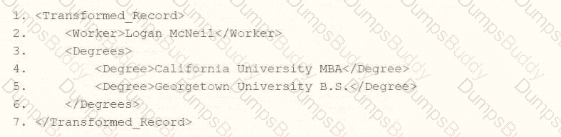
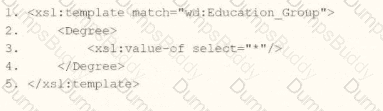
What is the XSLT syntax tor a template that matches on wd: Educationj3roup to produce the degree data in the above Transformed_Record example?
Options:


What option for an outbound EIB uses a Workday-delivered transformation to output a format other than Workday XML?
You need to create a report that includes data from multiple business objects. For a supervisory organization specified at run time, the report must output one row per worker, their active benefit plans, and the names and ages of all related dependents. The Worker business object contains the Employee, Benefit Plans, and Dependents fields. The Dependent business object contains the employee ' s dependent ' s Name and Age fields.
How would you select the primary business object (PBO) and related business objects (RBO) for the report?
Refer to the following scenario to answer the question below.
A connector is configured to detect changes to government IDs, personal information, and compensation data. The worker history report below shows recent transactions for a new hire.
Worker History: Audrey Richmond
The worker history includes a One Time Payment transaction for Audrey Richmond with an effective date of 05/01/2024, initiated on 05/15/2024, due date of 05/17/2024, and status of In Progress. Other transactions shown include ID Change, Personal Information Change, Hire, and Propose Compensation records.
You launch the connector integration to process changes with the following parameters:
As Of Entry Moment: 05/17/2024 12:00:00 AM
Effective Date: 05/17/2024
Last Successful As Of Entry Moment: 05/15/2024 12:00:00 AM
Last Successful Effective Date: 05/15/2024
Why will the integration output file exclude the one-time payment change?
Refer to the following scenario to answer the question below.
You have been asked to build an integration using the Core Connector: Worker template and should leverage the Data Initialization Service (DIS). The integration will be used to export a full file (no change detection) for employees only and will include personal data.
What configuration is required to ensure that when outputting phone number only the home phone number is included in the output?
How do you initially upload the XSLT file to a Document Transformation integration system?
A vendor needs an EIB that uses a custom report to output a list of new hires and their child dependent(s). You have been asked to create a calculated field that will be used to add only child dependent(s).
Which calculated field functions do you need to accomplish this?
Refer to the following scenario to answer the question below. You have configured a Core Connector: Worker integration, which utilizes the following basic configuration:
• Integration field attributes are configured to output the Position Title and Business Title fields from the Position Data section.
• Integration Population Eligibility uses the field Is Manager which returns true if the worker holds a manager role.
• Transaction Log service has been configured to Subscribe to specific Transaction Types: Position Edit Event. You launch your integration with the following date launch parameters (Date format of MM/DD/YYYY):
• As of Entry Moment: 05/25/2024 12:00:00 AM
• Effective Date: 05/25/2024
• Last Successful As of Entry Moment: 05/23/2024 12:00:00 AM
• Last Successful Effective Date: 05/23/2024
To test your integration, you made a change to a worker named Jared Ellis who is assigned to the manager role for the IT Help Desk department. You perform an Edit Position on Jared and update their business title to a new value. Jared Ellis ' worker history shows the Edit Position Event as being successfully completed with an effective date of 05/27/2024 and an Entry Moment of 05/24/2024 07:58:53 AM however Jared Ellis does not show up in your output. What configuration element would have to be modified for the integration to include Jared Ellis in the output?
The following XML code was generated using Core Connector: Location.
You need to validate that both the locc:Location_Name and locc:Municipality elements are not empty, and provide custom error messages with a severity level for each.
Which XSLT attributes and values should you use when producing a pipe-delimited file?
You need to filter a custom report to only show workers that have been terminated after a user-prompted date.
How do you combine conditions in the filter to meet this requirement?
As of May 1, 2024 Brian Hill ' s annual salary is $60,000.00. On May 13, 2024 Brian Hill received a salary increase and data was entered into Workday at 2:00 PM the same day. The new salary amount is set to $90,000.00 with an effective date of May 10, 2024.
Run #1
Core Connector: Worker Integration System was launched as an ad-hoc manual run on May 13, 2024.
As of Entry Moment: 05/11/2024 2:00:00 PM
Effective Date: 05/11/2024
Last Successful As of Entry Moment: 05/09/2024 2:00:00 PM
Last Successful Effective Date: 05/09/2024
What will be the expected output in the Run #1 of the Core Connector: Worker Integration System?
Refer to the following scenario to answer the question below.
You are implementing a Core Connector: Worker integration to send employee data to a third-party active employee directory. The external vendor requires the following:
The Employee ' s Active Directory User Principal Name.
A mapping from Worker Type values to external worker type codes.
A specific filename format that includes a timestamp and sequence number.
You also need to ensure the document transformation occurs before the file is delivered to the endpoint. The connector ' s output must be transformed before the file is delivered to the vendor.
What step must be taken to ensure this occurs correctly?
Refer to the following XML to answer the question below.
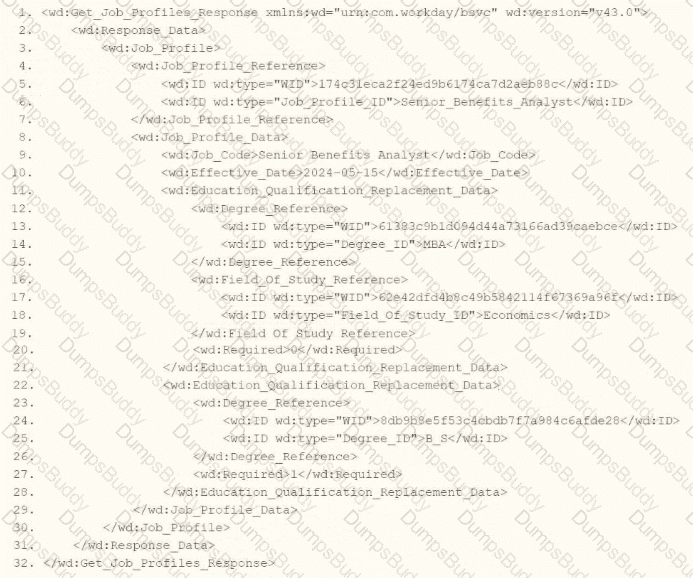
You are an integration developer and need to write XSLT to transform the output of an EIB which is making a request to the Get Job Profiles web service operation. The root template of your XSLT matches on the < wd:Get_Job_Profiles_Response > element. This root template then applies templates against < wd:Job_Profile > . What XPath syntax would be used to select the value of the ID element which has a wd:type attribute named Job_Profile_ID when the < xsl:value-of > element is placed within the template which matches on < wd:Job_Profile > ?
You are configuring the Core Connector: Location to send location data to a new global facilities management system. You must meet three specific requirements:
Task A: The facilities system requires that in addition to the default public address, the private address should also be included.
Task B: The facilities system uses the status codes “A” for Active and “I” for Inactive. You need to translate Workday’s “Active” and “Inactive” values from the Location Status field.
Task C: The facilities system requires a “Building Manager” value. You have already built a Calculated Field that retrieves the Facilities Manager role for each location, and you need to send this data in the integration.
How do you configure these tasks in the integration system?
How does an XSLT processor identify the specific nodes in an XML document to which a particular transformation rule should be applied?
Refer to the following XML to answer the question below.
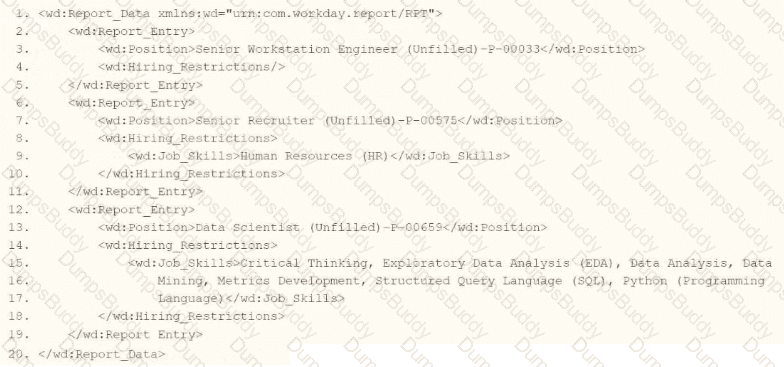
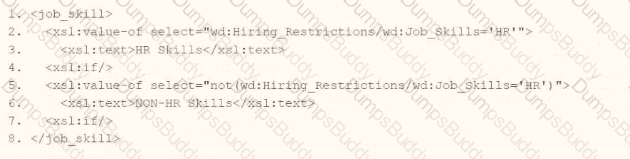
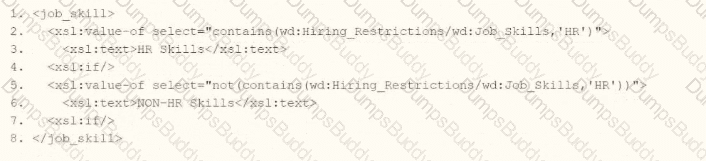
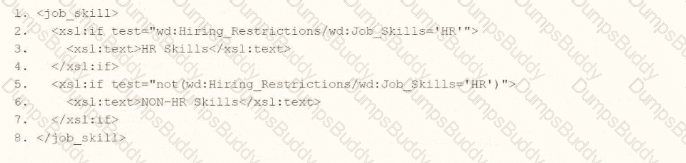
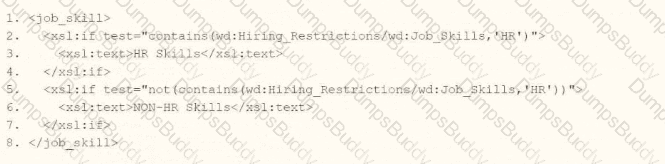
You are an integration developer and need to write X8LT to transform the output of an ElB which is using a web service enabled report to output position data along with hiring restrictions around skills. You currently have a template which matches on wd:Report Data/wd: Report .Entry for creating a record from each report entry.
Within the template which matches on wd:Report_Entry you would like to conditionally process the wd:Job_Skills element by using a series of < xsl:if > elements so as to categorize the job skills data.
Assuming all jobs will have the wd:Job_Skills element, what XSLT syntax would be used to output the text HR Skills if the value of wd:Job_Skills contains the text HR and output NON-HR Skills if the value of wd:Job_Skills does not contain the text HR?
Options:
Refer to the following scenario to answer the question below.
You have been asked to build an integration using the Core Connector: Worker template and should leverage the Data Initialization Service (DIS). The integration will be used to export a full file (no change detection) for employees only and will include personal data.
What configuration is required to output the value of a calculated field which you created for inclusion in this integration?
PDF + Testing Engine

Testing Engine
PDF (Q&A)

